Camping Themed Birthday Party: Camp S'more birthday party with ideas for a games and activities, homemade decorations, food, s'more buffet, and free printables!

Jump to:

Over the weekend we celebrated my daughter Paige's eighth birthday with a camping themed birthday party. We called it "Camp S'more", and had an amazing time roasting hot dogs, and making s'mores around a campfire, and enjoying the forest. It was so much fun. Paige was a very happy camper, and I think it's one of my very favorite birthday party themes, that works great for boys or girls.
Camping Themed Birthday Party
Today I want to share with you all the fun ideas from our camping themed birthday party. The first thing I did was book a local campground to use for the day. It's really close to where we live, but most of our guests had never been to it and lots said they always wanted to come in and see what it was like.
Paige really wanted to roast marshmallows, and with all the by-laws around campfires, coming here was a great solution for having a real fire. It also provided an amazing forest backdrop and large area to play, and lots of fun for the kids!
A backyard camping party is fun too, and depending where you live might work out great. We didn't actually sleep over for our party. We had a great campfire lunch, games, and crafts and then headed home. You could use all these ideas for an actual camping trip though, or a camp out in your own backyard too.
And if you're not fortunate enough to have a summer birthday, you could even use these ideas for an indoor party at home.

Camping Themed Birthday Party Decorations
Paige's favourite colour is aqua, so we decided to use that in all the party decorations.
I sewed some fun bunting flags to decorate the camp ground. We used the same method and pattern that I used for the Father's Day bunting. I love all the pretty shades, and textures of aqua fabric we found and how nice they looked waving in the breeze at the campground.

Along with the bunting, I used the same material to wrap a letter "P" for Paige on our welcome table. I just ripped strips and knotted them together as I wrapped, and I love the rustic look it created.

It's always nice to include a picture of the birthday girl. To make a rustic frame to go with our theme I used some twigs and hot glued them around a picture as an easy way to create a frame.
Camp S'More Sign
On our welcome table we had a large camp s'more sign. To make the sign I spray painted an old board aqua and used twigs to create the letters. It turned out so cute, and was really easy to make and a great way to welcome our party guests and set the mood for our camping-themed party.

Camp Hats
For party hats, I found white camp hats, and used a sticker to add our camp s'more logo. The kids looked so cute in their camp hats. Get our free Camp S'more printables here, including the one I used for the hats. It was a fun detail that made it feel a little like summer camp. Since the logos were just stickers, they could remove them after the party and use the hats again. It was a nice addition for our little campers to their party favors.

On our welcome table we also added a basket of assorted bug spray options -it was a wee bit buggy! Sunblock could be a good thing to include here too.

Camping Themed Birthday Party Table
For the kids food table, we used the picnic table that was at the campsite. I covered all the tables in white table cloths and then layered burlap on top. It added a great camp-y feel.

We used my plastic dollar store white plates on the table. I have to tell you they were a great investment; reusable, non-breakable, and dishwasher safe, not to mention better for the environment. The plates are layered with the cute polka dot napkins, and aqua water bottles. I felt like I carried around a napkin, water bottle cap and straw in my purse for weeks, since aqua can be a bit tricky and I kept having to refer to what I'd already bought to make sure the shades worked together -just part of being a party obsessed mom. 😉

Personalized Water Bottles
The water bottles were also from the dollar store, and I added the cute camp s'more logo with a sticker -get the free printable here. I made the individual tags with card stock and stamps and tied them on with aqua baker's twine. I love how all the little details turned out.

For the centerpiece for our camp party I found these pretty lanterns. I like that they are white and I'll be able to use them a lot, since they could go with anything. My mom did the beautiful flowers for me. I asked her for ferns, to go with our camping theme, and some white flowers. We arranged them in glass jars, and I love how they turned out.

I tried to create a runner effect with other natural elements. We used some twig and moss balls, pine cones, and birch balls. The birch balls are made by hot gluing birch bark strips to Styrofoam balls. Love how they turned out.

I also spray painted some acorns and pine cones - you know I am obsessed with and love spray paint! I wanted a cute way to add a few more pops of aqua on the table, but still keep the big things that I was re-using or hope to re-use in the future, neutral. this was a fun way to add some aqua colored details, that you could use for any color scheme.

We used another picnic table as a craft table, and place for adults to eat at. I did the centerpiece of lanterns, flowers and natural elements on it also.

There were a few little aqua butterflies tucked in too.

For one of the other tables I used a upside down old crate to display an antique lantern -actually my Grandma's old lantern that she used to use at night to go to the barn and do chores, nice to have a little bit of Grandma at the party. 😉 I also displayed these cute squirrels. They started out life as slightly questionable garden ornaments from the dollar store, but after having a little encounter with Mr. Spray Paint they got to fulfill their ornament destiny as centerpieces! I love how these creative ideas came together. Seriously, aren't they cute?

Don't Feed The Bears Sign
The fun detail that the kids liked was our "Don't Feed The Bears" sign, made with an old board, and a white paint pen. Don't forget to add in a teddy bear or two. It made everyone giggle.

Camping Birthday Party Games and Activities
We had a wonderful time at Camp S'more on the weekend for my daughter Paige's eighth birthday party. I wanted to do a few camping themed activities at the party for all the kids to enjoy. Here's what I came up with.
Polymer Clay S'more Charm

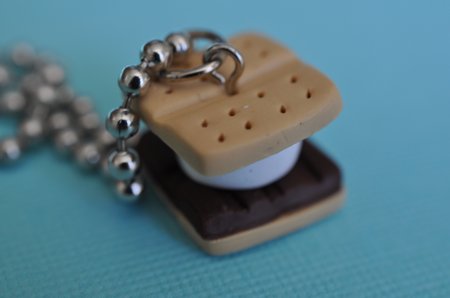
Since our camp name was Camp S'more, I wondered if we could do some kind of s'more themed craft, and I stumbled upon some cute s'mores made out of polymer clay.
Paige isn't really a jewellery girl, so we made ours into key rings, or backpack clips, but they could easily be slipped onto a chain and worn as a necklace, like this one I made as an example and wore for the party.

Materials
- beige polymer clay
- brown polymer clay
- white polymer clay
- rolling pin/dowel
- toothpick
- small square cutter
- jewelry pin
- wire cutters
- small pliers
- jump ring
- clip
- toaster oven
Instructions
- So, here's how we made them, everyone was given a little placemat to work on. We started out forming the marshmallow, since I found on my own first attempts that if you start with the other components, the tan and brown clay leave residue on the mat, and the white clay picks it up as you try and make your marshmallow.
- After the marshmallow the kids used these little dowel rods as rolling pins, and rolled out their graham crackers, then cut them with the mini square cutter and used a toothpick to make the characteristic line down the middle and small dots. For my first attempt at making them before the party, I used a small cardboard square as a template to help make the graham crackers the same size. I thought this might be a little tricky for the young children at the party. At Michaels I was pleased to discover that they make little cutters for polymer clay. The square one worked out great for the graham cracker and the chocolate square.
- The last part was the chocolate, rolled out and cut the same as the graham crackers and then we used a toothpick to make lines for the chocolate bar sections.
- After all three pieces were done they stacked them together, I cut and added a little jewellery eye pin from the craft store and then I baked them in our toaster oven for 30 min. according to the package instructions. After they cooled I added a little jump ring, and the key chain hooks. (Our campsite had electricity hookup and I made sure to also bring an extension cord.)


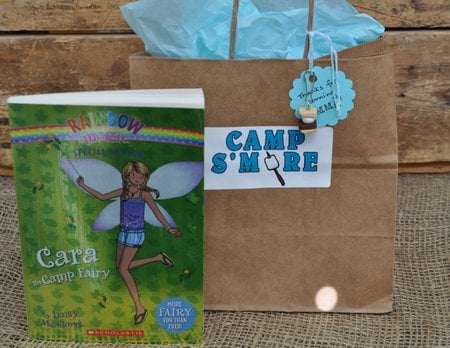
When they were all finished, we attached them to the loot bags. I love how they turned out, and the kids loved them too.

Camping Themed Loot Bags
Inside their loot bags they also had a camping themed book. For the older girls we choose "Cara the Camping Fairy" -Paige and her friends LOVE the Rainbow Magic Fairy books. For some of our younger guests, we found "Curious George goes Camping" and "Caillou Goes Camping".
This is the first time I've used books in loot bags and think it's a great idea. You know you're giving something that the kids will actually use, and sometimes it's nice to do one larger thing, instead of a bunch of little things. I've heard some reports that the kids really liked them too. And it's a great personal touch to use books that the birthday child loves and is excited to give to friends.
We did the s'more craft as soon as everyone arrived which worked out really well, since the kids were still fairly settled down and able to listen to the detailed instructions and it gave us time to bake and cool the clay.

Scavenger Hunt
After the s'more craft we went on a little nature themed scavenger hunt. This activity is really fun for guests of all ages. I made a scavenger hunt list -get all our camp s'more free printables here, and printed it right onto paper sandwich bags.

I found out how to print on paper bags over at Oh Happy Day, here's the scoop. You have to tape shut the bag and bottom flap so your printer doesn't get jammed, and set your printer to print on thick paper.


Feed them in one at a time, and once they're printed remove the tape. I did find the tape a little too sticky, even though it was painters tape, and found reusing it over and over helped. Or you can always just print on regular paper and attach it to a the bag.

One of the items to be found was a cute little paper gnome that we printed from a free printable.

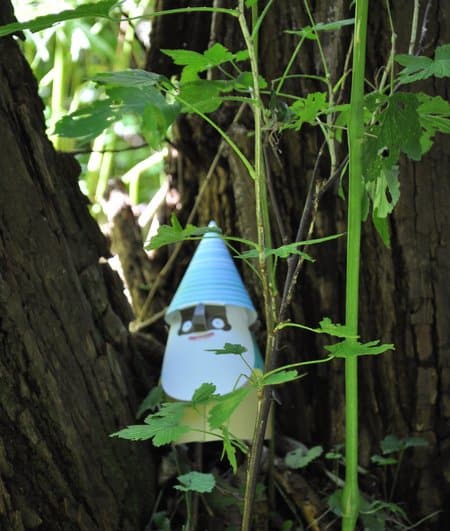
Grandma and Grandpa hid them in the woods while I was setting everything else up, and at scavenger hunt time the kids had a great time spotting and collecting them. This was a real hit, and so simple.

Outdoor Games
The other activities at the party were some games we brought, including badminton, kid's horse shoes, and croquet, but the kids had the most fun running around and playing with each other, and balancing on a few logs at the edge of the campsite. Of course there was also the hotdog roasting, and s'more making.
Camping Themed Birthday Party Food Ideas
I've been saving the best till last, the food! The idea for a camping themed birthday party came from my daughter wanting a campfire to roast hotdogs and marshmallows, so that's what we did.

I set up a little buffet for the hotdogs beside the camp fire.

The hotdog buffet included the dogs, and buns and some great toppings. Most of the kids just went for ketchup, but for the rest of us there were some delicious options like fresh chopped tomatoes from my mom's garden, relish, sauerkraut, pickles, onions and cheese.

I love a good hotdog, and nothing beats one roasted over a campfire.

Along with the hotdogs, we had simple veggies, dip and chips. The individual dip containers worked out really well -they were the perfect way to make things easy and made sure there was no double dipping. 😉

I picked up these cute little take-out french fry boxes and served kettle roasted potato chips in them. The individual servings made it really easy for everyone.

Custom Roasting Sticks
Before the party, I made custom roasting sticks for everyone -which turned out to be one of my favorite things about this party. Love is in the little details.

On a trip to the woods I collected some birch bark from the ground and used it to create labels on the sticks.
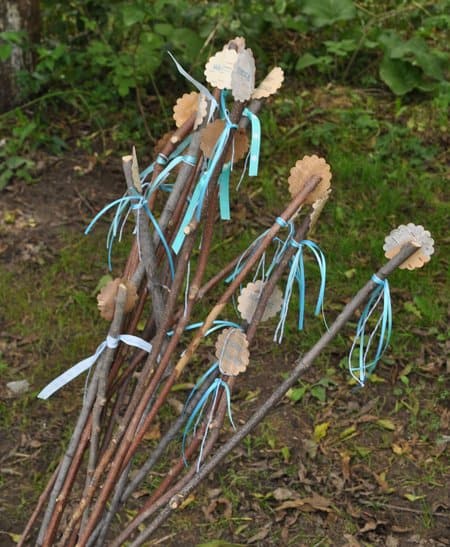
II cut the birch bark with a paper punch -which worked really well. Then I stamped on the kid's name, or Camp S'more, and finished it with some aqua ribbon to tie them into our theme colour.

It worked out really well; everyone had their own stick and they were super cute gathered around the fire pit roasting hotdogs and marshmallows.

Drinks
We also had a drink table at the party. We offered spring water and pink lemonade.

Since the weather was a little cooler, and fall like, we also had hot chocolate. We made it at home and brought it in some assorted thermos.

This worked out really well, since guest could help themselves and it stayed nice and hot. For the hot chocolate we also had some mini-marshmallows, some store bought and some of the home made ones, and whipped cream! I also really loved the cardboard cups, which came with lids -I found them at A Buck or Two.

S'mores Buffet
The rest of the food for our camping party was sweets. For dessert we enjoyed the much anticipated S'more Buffet dessert table!

One of my favourite little details was the marshmallow tree I made with sticks and mini marshmallows as a centrepiece for the table.

Cookies
I made three kinds of cookies to start with. First was the homemade graham crackers -read all about them here, -they really are so much better than store bought!

I also made chocolate chip cookies, and peanut butter cookies. They were all really good.

The cookies looked so good on top of the Rustic DIY Tree Slice Cake Stands that I made. Love it when a plan comes together (since it really is so rare.)

Marshmallows
We had six kinds of marshmallows at our s'mores station. Most of them I found on a cross-border shopping trip. There we got the chocolate, chocolate mint, and cinnamon bun. At home in Canada, I found coconut, and gigantic strawberry.

I made the home made vanilla -by far the best in my humble opinion.
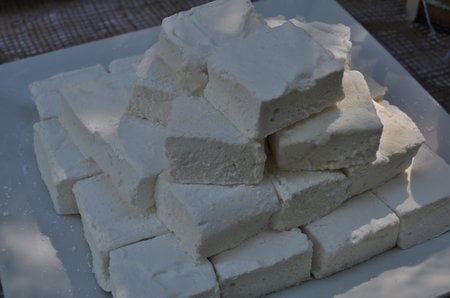
Admittedly I went a little overboard and there were tons left over, but I have to say for the impact it had, and the kids sense that they'd died and gone to heaven it was definitely worth it! And let's face, overboard is the way we roll around here!

Chocolate
Of course our s'mores also required chocolate. Why have just plain chocolate when you could have a whole bunch of kinds?

So we had milk chocolate, dark chocolate, chocolate with almonds, mint chocolate, caramel chocolate, and cookies and cream chocolate.

The guests all had a great time, mixing and matching different cookies, marshmallows and chocolate to come up with their own s'mores creations.


Birthday Cupcakes
They ate so many s'mores that they didn't have room for cupcakes!

I made cupcakes in a jar, since they're perfect for camping. Birthday cakes are great, but have to be sliced and served. The cupcakes in a jar we super easy to serve.
The cupcakes are in small mason jars, and tied them with baker's twine and the sweetest wooden disposable spoons. I found the plain spoons, and added the polka dots with the eraser end of a pencil and some aqua ink. They turned out so cute. Inside was a plain vanilla cupcake cut in half and layered with raspberry jam, and aqua coloured icing.

The cupcakes made a sweet end, to a very sweet day!

Camp S'more turned out great, the only problem, it was over too soon! I hope all these fun camping party ideas help inspire you. Birthday's only come around once a year, and it's so much fun to make birthday parties extra special.
With a camping themed birthday party, life is really a party!
Check out all the other amazing parties details, if you missed any, by clicking on the links:


dnr says
Brenda,
Great idea, I'll have to try it.
Thanks for the suggestions,
Dannyelle
Brenda says
I never thought about trying to feed a paper bag through my printer. What a good idea! You could probably avoid having to tape it if you feed the bottom of the bag into the printer first. You could flip your image upside down before printing it if you are using a graphics program. I'm not sure if you could do that with a word processing program, but you could maybe export your document as a jpeg file and then import it back in and turn that image upside down.
Kelly Green says
What a very cute idea! I love it!
Taryn @ Design, Dining + Diapers says
What an adorable favor!
Jeannine @ The Concrete Cottage says
Those little smores are adorable!!! Absolutely fantastic job!
Sabrina says
LOVE the Smore themed craft...
You are seriously gifted- especially in the "party" planning area.
How appropriate...
🙂