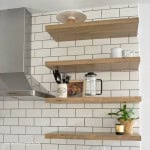
Affordable DIY Large Kitchen Floating Shelves
Equipment
- Saw
- router
- Drill
Ingredients
- ½ " galvanized flanges 2 for each shelf
- ½ " x 6" long threaded pipes 2 for each shelf
- 1 ¼ " diamond drill bit
- 1 x 12 pine boards cut to 28" lengths -or whatever length you need 2 for each shelf
- wood glue and clamps
- ⅛ " x 1" metal screws 2 for each shelf
- sandpaper
- wood conditioner
- wood stain
- polycrylic sealer
Instructions
- To create the shelf support attach two ½" galvanized flanges to a wall stud, making sure they're level with each other, and then screw a ½" x 6" long threaded pipe on to each one.
- To make the shelf, use two 1 x 12 inch pine boards. Use a router to route out a ¼" deep x 6" long channel in the same position on each side of the board, on both ends of the shelf. Then sandwich them together with wood glues and clamps to dry, and creating a hole in the finished shelf for the shelf bracket.
- Give the glued shelves a sand with fine grit sandpaper. Be sure to wipe them down to remove any sanding dust. Next apply wood conditioner to the wood shelves. Next stain the wood in a stain color of your choice. We combined two stains to achieve the color we wanted. Lastly seal the shelves with a polyacrylic sealer. We did three coats of the sealer for added durability.
- To install the shelves, slide them on to the shelf brackets. Make any minor adjustments necessary with small wood shims to make sure they're perfectly level, Then secure the shelf by drilling a hole through the wood shelf and into the metal pipe support, and then adding a metal screw right through the wood and into to the metal pipe to secure it.
