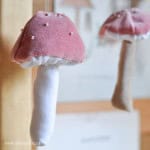
DIY Velvet Mushroom
Equipment
- Needle
- chopstick
Ingredients
- mushroom cap pattern free for subscribers in our Free Printable Library -subscribe below for access
- pink velvet
- beige velvet
- white velvet
- white thread
- stuffing
- beads
Instructions
- Cut three matching pieces of pink velvet to create the mushroom cap, using the pattern. Sew the three pieces together. Start with two matching pieces, back to back, with the velvet facing inward and sew halfway, stopping in the very middle. Next fold the top piece in half and add in the third piece, also with the velvet facing in. Continue sewing the top piece onto the third piece to finish the semi circle. Next sew the other two pieces together to finish the mushroom cap.
- Next, sew some small beads on to the top of the mushroom cap.
- To make the inside gills of the mushroom, cut a strip of white velvet that's about 1 ½ inches wide. Sew a long running stitch on one side of the velvet strip, and slightly gather the material all the way along. Measure the gathered fabric around the outside of the mushroom cap to get the perfect length, and then cut it to length, and tie off the running stitch. Sew the strip for the mushroom gills to the mushroom cap, with the good sides of the velvet facing each other. Finish it by sewing the side seam together. Trim the gill piece slightly, if necessary, so that the length is enough to nearly meet in the middle. Then stitch a running stitch along the other white velvet edge, and gather it tightly to create the mushroom gills. Finish it by tying it off tightly, and trimming and loose threads.
- To create the mushroom stems, cut a small piece of beige velvet into a rectangle shape. We're going to fold it along one side to create the stem tube shape. Stitch it together with the velvet sides facing in. Use a chopstick to help turn it right-side out. Stuff it with stuffing. Sew the end of the stem to the bottom of the mushroom cap.
