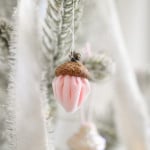
How To Make DIY Velvet Acorns
Equipment
- Glue Gun
- Needle
- scissors
Ingredients
- Acorn Caps
- Hot Glue
- Stretch Velvet
- Thread
- Wooden Skewers
- Stuffing
Instructions
- Begin by collecting some acorn caps. You only need the cap fo the acorn for this craft. If they're dirty, give them a wash and let them dry before using them.
- To make the bottom piece of the acorn choose some beautiful colors of stretch velvet. Cut the velvet into a small circle. For our acorn caps a oooo inch diameter circle was the perfect shape. You made need to adjust it slightly if your acorn caps are slightly larger or smaller than ours were.
- Once the circle of velvet is cut out, the next step is sewing the acorn bottom. You want to create a running stitch around the perimeter of the circle, quite close to the edge. Leave a long end of the thread at each end, so that it's easy to pull it together, and gather the velvet together to from the bottom of the acorn.
- Gather the bottom velvet piece together in stages, beginning by only gathering it slightly, and then stuffing it with a small amount of stuffing or even cotton balls. You don't want to over stuff it.
- Next, you will push a wooden skewer through the stuffing and all the way to the bottom of the fabric. Then you will carefully fully gather the acorn, pulling the threads all the way, until tight, and tying them off, leavin the end of the wooden skewer sticking out of the end.
- Next you will cut off the wooden skewer with some garden clippers, leaving some sticking out of the top. You will need to adjust the length according to your acorn cap. The acorn cap should press against the end of the skewer and maintain the point shape. You don't want the skewer too long, or it would be visible. Leave it just long enough to fit within the acorn cap, but also stick out enough to create the point of the acorn shape as the skewer is pressing against the inside of the acorn cap.
- To attach the acorn cap to the velvet, use your glue gun to apply a bit of glue to the inside of the acorn cap. You want to press the bottom on to the cap, making sure the raw edge of the velvet is contained within the cap, and hold it firmly while the small amount of glue sets.
- Once the glue is set the acorn is finished.
Video
